Did you know that over 4 million golfers now use home golf simulators for both practice and play? Whether you dream of epic movie nights or realistic fairway drives, getting the right setup takes more than plugging in gadgets. Careful planning lets you enjoy seamless swings, incredible sound, and pitch-perfect visuals all in one room. Discover how simple space tweaks and smart choices can turn an ordinary space into your favorite place to unwind.
Table of Contents
- Step 1: Assess Space Needs For Media And Golf Simulators
- Step 2: Plan Layout For Optimal Viewing And Acoustics
- Step 3: Select High-Performance Audio Visual Equipment
- Step 4: Integrate Smart Home And Lighting Systems
- Step 5: Test Functions And Optimize Your Media Room
Quick Summary
| Key Point | Explanation |
|---|---|
| 1. Prioritize Space Requirements | Ensure a minimum room size of 12×16 feet and 10-foot ceiling for comfortable golf simulator usage. |
| 2. Design for Optimal Viewing and Sound | Position seating 1.5 to 2 times the screen width with strategically angled speakers for a balanced acoustic environment. |
| 3. Invest in High-Quality Equipment | Choose 4K projectors, multichannel sound systems, and components with advanced connectivity for a premium experience. |
| 4. Integrate Smart Lighting Systems | Automate lighting to minimize screen glare and create immersive atmospheres tailored to various activities. |
| 5. Test and Calibrate All Components | Fine-tune audio, video, and lighting settings for peak performance; set presets for activities like movies or gaming. |
Step 1: Assess Space Needs for Media and Golf Simulators
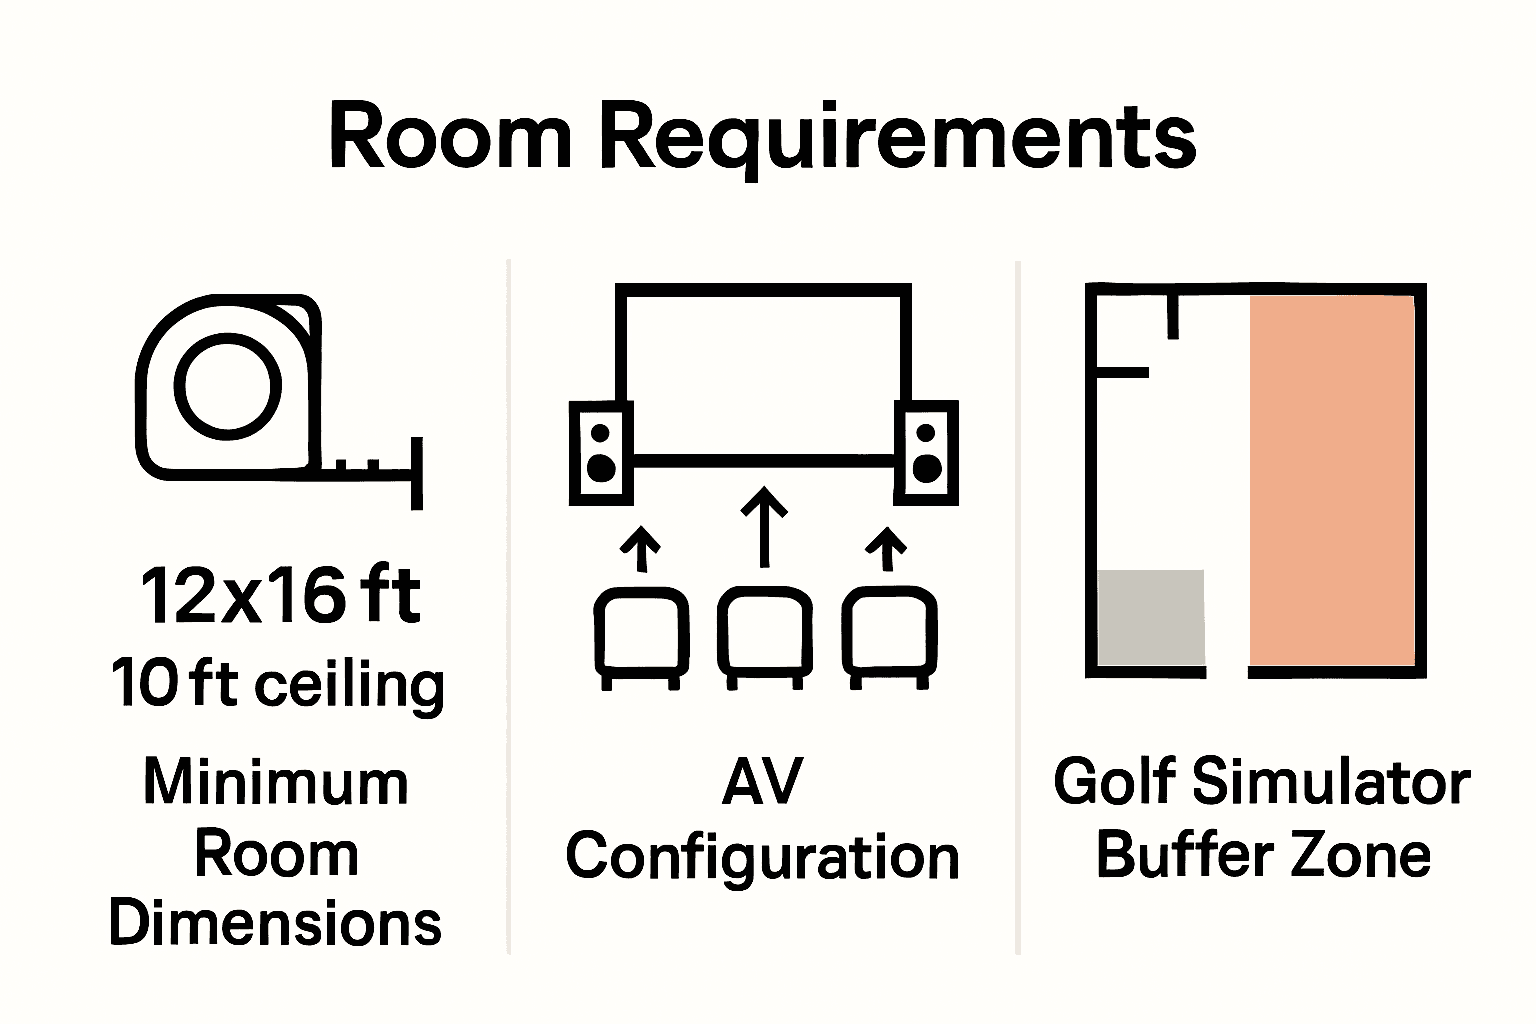
Designing the perfect media room with a golf simulator requires careful space planning and strategic measurements. Your goal is to create an immersive entertainment zone that accommodates comfortable golf swings and provides an engaging multimedia experience.
According to the National Golf Foundation, simulator technology has become increasingly popular, with over 4 million golfers now utilizing these advanced setups. This means your space planning must prioritize both functional golf performance and entertainment comfort. Typically, you will need a minimum room width of 12 feet and a length of 16 feet to ensure proper swing mechanics and realistic ball tracking. Height is equally crucial most golf simulator setups require a ceiling clearance of at least 10 feet to accommodate full swing motions without restrictions.
Pro tip: When measuring your space, add an extra 2 3 feet of buffer around your primary simulator area. This extra room allows for unrestricted movement provides space for additional equipment like launching monitors or seating and prevents accidental wall or furniture impacts during energetic golf swings.
 Always measure twice and plan carefully to transform your media room into a multifunctional entertainment paradise.

The next step involves selecting the right technological components that will seamlessly integrate into your carefully measured space.
Step 2: Plan Layout for Optimal Viewing and Acoustics
Creating the ultimate media room requires strategic planning to maximize both visual and auditory experiences. Your goal is to design a space that delivers immersive entertainment with perfectly balanced sound and sight lines.
As AVIXA emphasizes, successful room design begins well before equipment selection. Consider the room’s geometry carefully position your primary viewing area where sound and visuals converge most effectively. Aim to create a sweet spot where your media screen sits at eye level when seated and speakers are positioned to create a balanced acoustic environment. Typically this means placing the primary seating area about 1.5 to 2 times the screen width from the display and angling speakers to create a focused sound field.
Pro tip: Incorporate acoustic treatments like sound absorbing panels or soft furnishings to reduce unwanted echo and sound reflection. These strategic additions can dramatically improve your room’s sound quality without compromising the aesthetic design. Strategic placement of rugs carpets and upholstered furniture can also help manage room acoustics naturally.
With your layout planned your next step involves selecting the right audio and visual equipment to bring your media room vision to life.
Step 3: Select High-Performance Audio Visual Equipment
Choosing the right audio visual equipment is critical to transforming your media room into an immersive entertainment powerhouse. Your goal is to select components that deliver exceptional sound and crystal clear visuals that make every movie night or gaming session feel like a premium experience.
According to Diamond Certified, setting up a home theater system can dramatically enhance your entertainment experience. When selecting equipment focus on key components like a high resolution 4K projector or large screen television paired with a multichannel sound system. The UMA Technology recommends positioning your viewing area 1.5 to 2.5 times the diagonal screen size for optimal viewing especially with 4K resolution displays. Consider investing in a receiver that supports Dolby Atmos or DTS:X for three dimensional sound that creates a truly immersive audio landscape.
Pro tip: Future proof your media room by selecting equipment with advanced connectivity options like HDMI 2.1 multiple 4K input ports and smart home integration. This ensures your system remains compatible with emerging technologies and can easily accommodate new gaming consoles streaming devices or multimedia equipment.
With your high performance equipment selected your next step involves configuring and calibrating the system for peak performance.
Step 4: Integrate Smart Home and Lighting Systems
Transforming your media room into a smart entertainment hub requires strategic integration of lighting and home automation technologies. Your goal is to create a seamless environment where technology enhances your viewing and gaming experiences with intuitive control and ambiance.
According to Diamond Certified, choosing the right room environment is crucial for optimal entertainment experiences. Integrate smart lighting systems that can automatically adjust brightness levels color temperatures and create preset scenes for different activities like movie watching sports viewing or gaming. Automated lighting can help minimize screen glare reduce eye strain and create immersive atmospheric experiences synchronized with your audio visual content.
Pro tip: Select a smart home control system that allows unified management of lighting audio visual equipment motorized shades and other entertainment technologies. Look for platforms that offer smartphone app control voice activation and programmable scenes that can transform your media room from bright and energetic to dark and cinematic with a single command.
With your smart systems integrated the final step involves fine tuning and personalizing your ultimate home entertainment space.
Step 5: Test Functions and Optimize Your Media Room
With all your equipment installed the final step is meticulously testing and fine tuning your media room to ensure an exceptional entertainment experience. Your goal is to calibrate every component for peak performance and create a seamless technological environment.
According to Diamond Certified, setting up a home theater system is about transforming your entertainment experience. Start by systematically testing each component with high quality audio and video content that showcases your system capabilities. UMA Technology recommends positioning your viewing area precisely 1.5 to 2.5 times the diagonal screen size to optimize visual clarity and immersion. Use professional calibration tools or consider hiring an expert to fine tune audio levels color balance and speaker positioning.
Pro tip: Create multiple preset configurations for different activities like movie watching sports viewing gaming or music listening. Each preset should automatically adjust lighting sound system volume screen brightness and other environmental parameters to deliver the perfect experience with a single command.
With your media room now optimized you are ready to enjoy an unparalleled home entertainment experience that rivals professional theaters.
Elevate Your Media Room to Unmatched Home Entertainment
Designing a media room that perfectly balances golf simulator space, immersive audiovisuals, and smart lighting can feel overwhelming. This article highlights the challenges of measuring space accurately and selecting technology that delivers stunning visuals and crisp sound without sacrificing comfort. If you want a media room that truly brings your entertainment dreams to life with effortless control over lighting and sound, professional guidance is key.
At Atlanta Home Theater, our expert team has been transforming home entertainment since 1996. From custom golf simulators and high-performance home theaters to smart lighting that adapts to every moment, we help you create spaces that captivate and inspire. To get sound tips and practical advice on upgrading your media experience, check out our Sound Advice Archives – Atlanta Home Theater. Ready to start your personalized design journey? Visit Atlanta Home Theater today and schedule a consultation with our professionals who will guide you step by step toward your ultimate media room.
Frequently Asked Questions
How do I assess space needs for a media room with a golf simulator?
To assess space needs, ensure your room has a minimum width of 12 feet and a length of 16 feet. Measure carefully and add an extra 2 to 3 feet of buffer around the simulator area to allow for free movement and safety.
What layout should I plan for optimal viewing and acoustics in my media room?
Position your primary seating area about 1.5 to 2 times the screen width from the display for the best viewing experience. Ensure that speakers are angled to create a focused sound field for balanced acoustics.
Which audio visual equipment is necessary for the ultimate home entertainment experience?
Select high-resolution 4K projectors or large screen televisions, paired with multichannel sound systems. Aim for a receiver that supports Dolby Atmos or DTS:X for three-dimensional sound.
How can I integrate smart home systems into my media room?
Incorporate smart lighting systems that can adjust brightness and create preset scenes for different activities. Choose a smart home control system that allows you to manage lighting and audio visual equipment from one interface.
What steps should I take to test and optimize my media room?
Start by testing each component with high-quality audio and video content to gauge performance. Adjust settings like audio levels and color balance using calibration tools or by seeking professional assistance to ensure peak performance.
How can I create different settings for various activities in my media room?
Set up multiple preset configurations for activities like movie watching, gaming, or music listening. Each preset should automatically adjust lighting, sound, and screen settings to provide the ideal atmosphere with a single command.